Share this post
Comprehensive Guide To Two Way Switch Wiring
- ,
- , Wiring
Want to control a light from two spots in your house? This guide gets straight to the point on two-way switch wiring. We’ll show you how to set it up, explain the important bits like L1 and L2, and help you fix common issues. Get ready to make your home lighting more convenient and safe.
Understanding Two-Way Switch Wiring
Two-way switch wiring is fundamental for creating versatile lighting circuits, allowing you to control a single light source from two separate locations. This functionality is handy in areas such as staircases, hallways, or large rooms where multiple access points to the lighting control are practical and enhance user convenience.
The magic behind two-way switching lies in its ability to alternate the flow of electricity between two different paths, enabling the on/off control from either switch location. This system involves two switches and a light (or lights) connected by a three-core earth cable running between the switches.
When wiring a two-way switch, you’ll encounter three terminals: common (C), L1, and L2. The common terminal connects to the live wire from the circuit. L1 and L2 are the carriers for the electrical circuit to travel between the switches, allowing the light to be turned on or off from either switch.
For those venturing into DIY electrical projects, understanding each component’s wiring layout and function is crucial. Not only does it ensure the efficient operation of your lighting, but it also safeguards against potential electrical hazards.
The Role of L1 and L2 in Two-Way Switches
In two-way switches, the terminals L1 and L2 play critical roles. Depending on the switch position, they are the points through which the electrical circuit is completed or interrupted. In essence, they allow the electrical current to travel from one switch to the other, allowing light control from two separate locations.
Understanding what L1 and L2 mean on a switch is vital for anyone installing or troubleshooting a two-way switch system. The common terminal (C) is connected to the live wire from the mains. L1 and L2 then facilitate the alternate paths that the current can take to reach the light fixture.
Ensuring that the wires are correctly connected to these terminals is paramount when wiring or rewiring a two-way switch. An incorrect connection can lead to the circuit not functioning as intended or creating a safety hazard. It’s also worth noting that the colour coding of wires in your home may vary depending on the age of the installation and local regulations, making it essential to identify wires correctly before proceeding.
In addressing common questions, whether it matters if you use L1 or L2 for specific wires, the answer is nuanced. While the circuit’s operation does not change fundamentally, consistency in wiring practices is crucial for clarity, especially for future maintenance or troubleshooting. As for L1 and L2’s orientation, it generally does not matter which way they go as long as the wiring is consistent and conforms to safety standards.
Three wires in a two-way switch, including the earth wire, underscores the importance of grounding in preventing electrical shock. Grounding provides a safe path for electricity to follow back to the ground in case of a fault, enhancing the safety of your electrical system.
Wiring Diagrams and Installation Guide
A clear understanding of wiring diagrams is essential for anyone looking to install or understand two-way switch circuits. These diagrams serve as a roadmap, illustrating how the switches, wires, and light fixtures connect to form a functional and safe circuit.
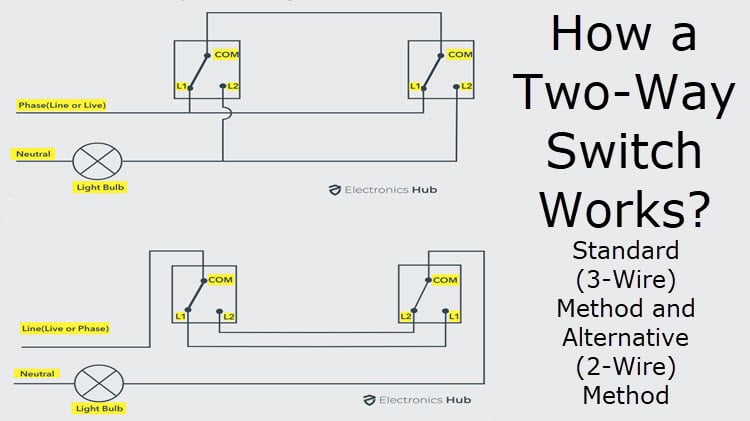
When viewing a two-way switch wiring diagram, you’ll notice two switches connected by three wires (excluding the earth wire) running between them. One switch’s common (C) terminal is connected to the live feed from the mains. The same terminal on the second switch is connected to the light fixture. The L1 and L2 terminals then interconnect the switches, allowing for light control from two locations.
Installation begins with ensuring the power is turned off at the mains to prevent electrical accidents. Next, connect the live feed wire to the common terminal of the first switch. The three-core cable then runs from the first switch to the second, with wires from this cable connecting to the L1 and L2 terminals on both switches. Finally, another wire runs from the common terminal of the second switch to the light fixture.
Proper installation not only ensures the functionality of the two-way switch but also its compliance with electrical safety standards. It is crucial to adhere to local building codes and regulations, and when in doubt, consulting with or hiring a professional electrician is advisable.
Troubleshooting Common Issues with Two-Way Switches
Even with a correctly installed two-way switch circuit, issues can arise. Common problems include the switches not operating the light as expected or the circuit working from one switch but not the other. Understanding how to troubleshoot these issues can save time and frustration.
Switches Not Operating Correctly:
If the two-way switches do not operate the light correctly, the first step is to check the wiring connections. Ensure the live feed is connected to the common terminal and that L1 and L2 are correctly wired between the switches. Incorrect wiring is the most common cause of functionality issues.
Light Only Operates from One Switch:
This issue often results from the wires not being connected to the correct terminals. Verify that L1 and L2 are properly interconnected between the switches. Also, check that the standard terminals are correctly connected to the live feed and the light fixture.
Electrical Safety Concerns:
If there’s any concern about the safety of the wiring, such as flickering lights or sparks, it’s essential to turn off the power at the mains immediately. Consult with a professional electrician to address these safety concerns.
When troubleshooting, it’s also essential to check the condition of the switches and wires. Switches can wear out over time, or wires can become loose, corroded, or damaged, affecting the circuit’s operation.
Wiring Diagrams and Practical Steps for Two-Way Switches
A practical understanding of two-way switch wiring is complete with diving into wiring diagrams and step-by-step instructions. These tools are invaluable for visualising connections and guiding DIY enthusiasts through installation.
A typical two-way switch circuit involves two switches and a light fixture. The wiring diagram for this setup shows the live wire from the mains connected to the common terminal of the first switch. Two core cables, known as the traveller wires, connect both switches’ L1 terminals and L2 terminals, allowing the electrical current to travel between them. The common terminal of the second switch is then connected to the light fixture, completing the circuit.
Step-by-Step Wiring Instructions
Safety First: Ensure the power is off at the mains before starting any electrical work. Use a voltage tester to confirm.
Prepare the Cable Runs: Lay out the three-core and earth cable between the two switch locations and from the second switch to the light fixture.
Connect the First Switch: Attach the live wire to the common terminal and connect the traveller wires to L1 and L2. Ensure the earth wire is grounded.
Wire the Second Switch: Connect the other ends of the traveller wires to L1 and L2, respectively, and attach the wire leading to the light fixture to the common terminal. Ground the earth wire.
Finalise the Light Fixture Connection: Connect the wire from the second switch to the light fixture, ensuring it’s properly secured and grounded.
Test Your Work: Once everything is wired, turn the power back on and test the switches to ensure they operate the light correctly from both locations.
Wiring diagrams serve as a roadmap, simplifying the complexity of electrical circuits. Following these diagrams and steps carefully will help ensure a successful installation, enhancing your electrical system’s functionality and safety.
Find Out More: What Types Of Wiring Is suitable for Two Way Switch Wiring
Troubleshooting Common Issues in Two-Way Switch Wiring
Even with careful installation, issues can arise in two-way switch circuits. Knowing how to troubleshoot common problems is essential for maintaining a safe and functional lighting system.
Common issues include:
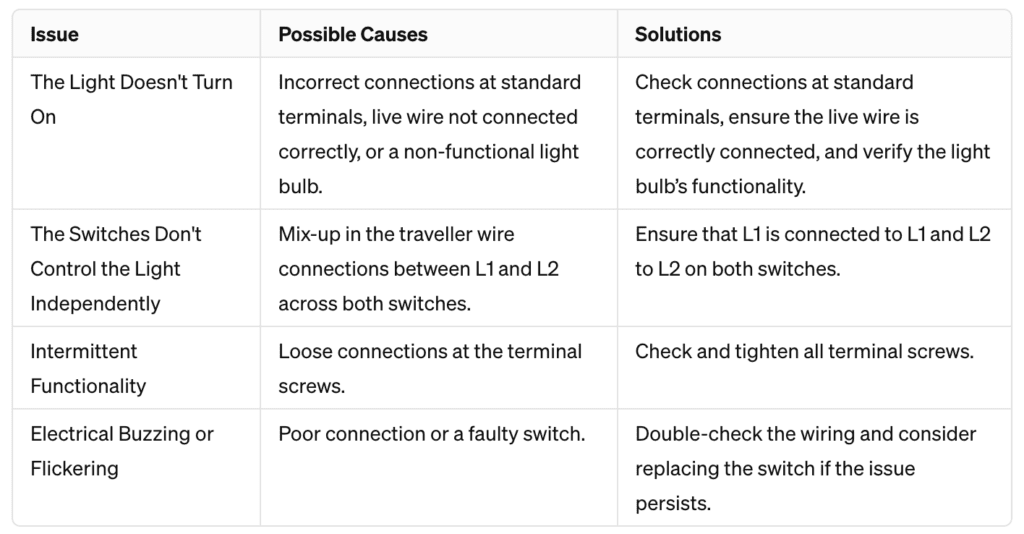
The Light Doesn’t Turn On: If the Light doesn’t operate from either switch, check the connections at the standard terminals and ensure the live wire is connected correctly. Also, verify that the Light bulb is functional.
The Switches Don’t Control the Light Independently: If operating one switch seems to affect the functionality of the other, there may be a mix-up in the traveller wire connections. Ensure that L1 is connected to L1 and L2 to L2 on both switches.
Intermittent Functionality: Loose connections can lead to inconsistent operation. Check all terminal screws to ensure they’re tight and secure.
Electrical Buzzing or Flickering: This can indicate a poor connection or a faulty switch. Double-check the wiring and consider replacing the switch if the problem persists.
Always turn off the power at the mains when troubleshooting to prevent electric shock. Using a multimeter to test continuity and voltage can also help identify where the problem lies within the circuit.
Extending Two-Way Switching to Multiple Locations
Expanding the functionality of two-way switching to control a light from more than two locations—such as in large rooms, multi-story homes, or long hallways—requires integrating intermediate (or three-way) switches into the Circuit. This setup enables you to add one or more additional control points beyond the basic two-way configuration.
Key Concepts for Multi-Way Switching:
Intermediate Switches: These switches have four terminals: two for incoming traveller wires and two for outgoing traveller wires. They work by changing the direction of the current between the traveller wires, allowing for control from multiple points.
Wiring Configuration: The standard terminals of the first and last switches in the Circuit are connected to the live wire and the light fixture, similar to a basic two-way setup. The intermediate switches are wired between the two-way ones using four-core and earth cables.
Practical Steps:
Plan the Circuit: Determine the number of control points needed and the locations of the two-way and intermediate switches.
Wire the First Two-Way Switch: This remains consistent with the primary two-way wiring method.
Install Intermediate Switch(es): Connect the traveller wires from the first two-way switch to the input terminals of the first intermediate switch, then use the four-core cable to link the output terminals to the next switch in the sequence.
Complete the Circuit with the Last Two-Way Switch: Wire the final two-way switch, connecting it to the preceding intermediate switch and the light fixture.
This approach allows for extensive flexibility in lighting control, making it convenient to operate lights from multiple locations within a space.
Understanding and Integrating Modern Smart Switches
With the advent of smart home technology, integrating smart switches into two-way switching circuits offers enhanced functionality, remote access, and programmability. Smart switches can replace traditional two-way switches, allowing for control via mobile devices, voice commands, or automation routines.
Considerations for Smart Switch Integration:
Compatibility: Ensure the intelligent switch is compatible with two-way switching setups and your home’s wiring. Some smart switches require a neutral wire, which may not be present in older installations.
Wiring Adjustments: Wiring a smart switch in a two-way circuit may differ from traditional wiring. Follow the manufacturer’s instructions carefully, as some smart switches use wireless communication to interact with each other, eliminating the need for traveller wires.
Functionality: Smart switches offer features like scheduling, energy monitoring, and integration with other smart home devices. Consider your needs and choose a switch that provides the desired level of control and compatibility with your smart home ecosystem.
Implementation Steps:
Select the Right Smart Switch: Research a switch that fits your technical requirements and desired features.
Install the Smart Switch: Replace one or both of the traditional two-way switches with smart switches, following the manufacturer’s wiring diagram and instructions.
Configure and Test: After installation, configure the switch using the manufacturer’s app, connect it to your home network, and test its functionality within your two-way switching setup.
Integrating smart switches into two-way circuits modernises your home and adds a layer of convenience and efficiency previously unattainable with traditional systems.
Advanced Configurations: Extending Two-Way Switching
Understanding how to integrate more complex arrangements becomes crucial for those looking to expand their two-way switching setup beyond the basic configuration. This includes adding more switches into the mix, such as in a multi-way switching setup, allowing control of a single light source from three or more locations.
Intermediate Switches:
The intermediate switch, which sits between two two-way switches in the circuit, is critical in extending two-way switching. Unlike the two-way switch, an intermediate switch has four terminals: two for the incoming traveller wires from one two-way switch and two for the outgoing traveller wires to the next two-way switch.
Wiring an Intermediate Switch:
Safety: Always start by ensuring the power is off.
Cable Layout: Run three-core and earth cables from each two-way switch to the intermediate switch.
Connection: Connect the incoming L1 and L2 wires from the first two-way switch to the corresponding terminals on one side of the intermediate switch. Then, connect the outgoing L1 and L2 wires to the terminals on the other side, leading to the next two-way switch.
Testing: After wiring, turn the power back on and test the switches to ensure the light operates correctly from all locations.
By integrating intermediate switches, you can significantly increase the versatility and convenience of your lighting system, especially in large or multi-level homes.
For more information on 2 way switching, why not watch the recommended video below for more help.
Common FAQs On Two Way Switch Wiring
Can the wiring sequence affect the functionality of two-way switches?
The sequence of wiring, particularly the traveller wires (L1 and L2), does not affect the basic functionality of the switches. However, consistency in wiring practices is essential for troubleshooting and future modifications.
What happens if you wire a two-way switch wrong?
Incorrect wiring can lead to several issues, such as the light not operating correctly, switches not working independently, or even potential safety hazards. Always double-check connections against wiring diagrams.
Why does my two-way switch have 3 wires?
The three wires include the live wire (connected to the common terminal) and two traveller wires (connected to L1 and L2). Depending on the switch positions, this setup allows the circuit to be completed through either path.
How do you wire a two-way switch to a single?
Converting a two-way switch to a single switch involves removing one of the switches and connecting the live wire directly to one terminal of the remaining switch. The other terminal is then connected to the light, making the setup function as a simple on/off switch.
Does it matter which wire goes to L1 and L2?
While the operation of the switch does not depend on which wire goes to L1 or L2, maintaining consistency is essential for clarity and safety. Always follow the wiring diagram and local regulatio
Is L2 live or neutral?
In a two-way switch setup, neither L1 nor L2 is considered live or neutral in the traditional sense. These terminals are used for the traveller wires that carry the circuit between the two switches. The common terminal is connected to the live wire from the mains.